How to design a sign-up flow: Balsamiq Cloud case study
9 min. readDesigning a Sign-Up flow for a web app is much harder than you’d think. It requires a balance between usability and security, with a sprinkle of marketing on top.
Every web app has a way for users to sign-up and create an account. You've probably signed up for many yourself.
You could be forgiven for thinking that it's an easy feature to code and design — just ask for an email and a password, and let people in!
Unfortunately, it's not that simple. Designing a good Sign-Up flow for a web app requires finding a balance between usability and security, along with a dash of marketing.
In this article, I'll share the process behind the wireframe we created to build the Sign-Up flow for Balsamiq Cloud. We hope it will be useful if you have or are planning on building a web app, or if you just want to see how we use Balsamiq ourselves.
The full picture
Here's the complete wireframe for our Sign-Up flow:
Pretty scary, huh? Don't worry, we'll go through it screen by screen.
Note: You can find the source file of the wireframe above in Balsamiq's Templates library (just search Quick Add for Sign-Up Flow).
One thing you can notice right away is that we have 2 main flows: one for username and password (with 5 steps), and another for Google authentication (with just 3 steps).
They both start with the landing page.
The landing page: Make it frictionless!
There are many resources online that can help you design the perfect landing page for your web app, so I will only focus on the sign-up section.
Here you have 2 options: create a dedicated sign-up page, or make the sign-up happen inside the landing page.
A dedicated page might look cleaner and might be easier to code, but it's also an additional page for users to find, wait for while it loads, and learn how to use when they get to it. Also, a dedicated sign-up page will probably lack some of the context that the landing page provides.
For these reasons, we suggest having the sign-up form live inside the landing page. In fact, we do the same for the login form as well!
Now, there are different ways to have those forms on the landing page. Here's how you might think of doing it first:
Clearly, that's a terrible UI: it's a wall of form fields which is both confusing and intimidating.
Is this really the first impression you want to give your potential customers? 😊
Let me show you an alternative:

That's it! 😊
Here are some of the tricks used on this design:
- The login and sign-up features are visually very different — one is a link, the other is a form. This makes sure people won't confuse the two.
- The login link is in the top-right, where people expect it to be, and it's far away from the sign-up form. Again, this reduces the chance that people will confuse the 2 features.
- Most importantly, it moves the 2 scary-looking login and sign-up forms to a second step, keeping the landing page nice and clean.
Together they make quite a difference, don't you think?
Let's proceed.
The classic: Username and password authentication
Let's start with the most common authentication method: username and password.
You've already asked the user for their email on the landing page, now it's time to ask them a little more info.
Once your prospect clicks on Start Trial on the landing page, this dialog pops up:
There are a lot of micro-interactions here that are worth exploring:
- Every field shows the little red * which means "this field is required".
- The Email address field is pre-populated with what they already typed — no need to make them type it again! It also gives them context, it's something that ties the previous screen with this one.
- There's no separate Username field: the email is unique and descriptive enough to be used as the main unique identifier for each user.
- The focus is automatically set to the Full Name field, which is the first field they'll have to fill in. This lets users start typing, without having to use the mouse to click on the right field.
- The TAB key lets people navigate between the different form fields — good for accessibility, and help your power users sign up quickly.
- Having a single Full Name field instead of separate First and Last name fields is more inclusive... there are large parts of the world that don't use first and last names. In Balsamiq Cloud we require both right now because Stripe requires them but we plan on improving this in the future.
- There's only one password field. Forcing people to confirm the password is annoying, and it's not necessary. Instead, give users the option to show the password in clear, with a little eye icon toggle inside the password field. If they mistype the password, they can always reset it easily — assuming you design that flow well, of course. 😉
- There is a password security policy, but it's a very simple one: a minimum of 8 characters. That's easy to understand, easy to comply with, and provides plenty of security on its own. Asking for anything more complex increases security moderately, but increases user frustration massively. 😊
- Once the user types 8 or more characters, the "at least 8 characters" text turns green, to give them some feedback that they passed this small test, and can move on.
- If the user tabs or clicks away from the password field without entering a valid password, the border of the text field turns red, to show an error.
- Remember to show the standard Privacy Policy and Terms of Service checkbox. The links should open in new browser tabs, so that they don't interrupt the sign-up flow.
- There is a "Continue" button, that stays disabled until all the fields are filled in correctly.
- There is also a "Resend Verification Email" link, in case they never got the email and want to try again. This is a good spot to hide this link, because this is where they entered their email address in the first place, so they should be able to find it again while they scramble to try and complete the sign-up process.
Let's continue!
OK, so they filled in the small form, and clicked Continue.
Unfortunately, you can't just create their user account now and let them in. You have to make sure they can receive your emails. This is critical, because that's how they'll be able to reset their password if they need to, and how you'll send them important communications about their account.
In the past, several web apps would let users in while the email got confirmed, but it's confusing — you have to add the concept of "unverified user", which makes everything harder. It also has security implications: I could sign-up with your email address, and thus prevent you from doing so in the future!
Instead, most web apps now make confirming the email an integral part of the sign-up flow, like this:

That's it: not a lot of text. It shows the email address so that they can confirm it is spelled correctly, and just tells them to go check their email to continue the process.
A quick aside: The Resend Verification Email dialog
Here's what it looks like:

Nice and simple: you pre-fill the email with what they typed before, you put focus on the Email field, and when they confirm you show them the email address, and give them an easy way to contact support in case they're stuck.
Back to the main flow: Time to check email!
First of all, you need to make sure your back-end system ensures a very high level of deliverability and speed for transactional emails. This is much easier said than done, so we rely on Postmark for this.
Let's look at the anatomy of this email message:
- It comes from "Product Name <support@yourdomain>" — no hostile "no-reply" crap! Make it easier for people to reply to it, and for your support team to help them!
- It includes your product logo and name — this ties the email to the landing page, it makes it feel part of the same flow.
- It has short text and a clear call-to-action button.
- It shows the verify URL both as a button and as a link. This is useful for old email clients, or if people need to copy/paste the link instead of clicking (it happens more than you'd think).
- In the footer, it tells people what your product does and how to contact support. This is mostly useful if someone receives this email by accident, but it also provides some context, and shows that you're approachable and happy to support them.
Almost there: Confirm with a login
Once the user clicks on the Verify Account button or link, they're almost done!
Again, you can't just create their account quite yet, it's not secure. Instead, show them a login screen like this one:
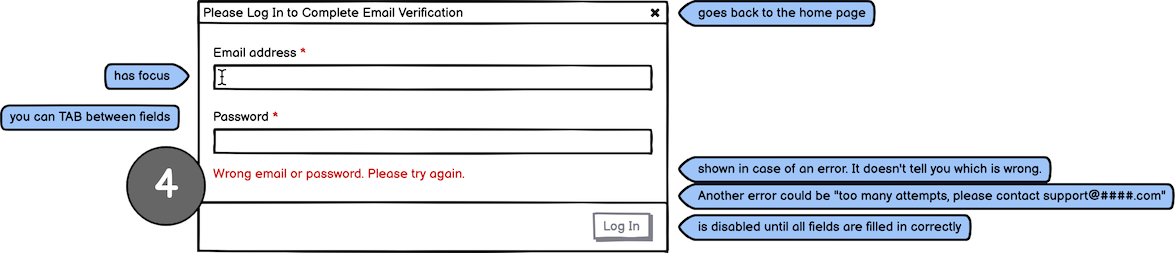
A few things to notice:
- The title says "Please login to Complete Email Verification", which ties the login to the email they just clicked on.
- The Email address has focus, but it's not pre-filled this time. It's more secure this way, and plus what you're really doing is training your users on how to login! You're showing them a form they'll have to use again in the future, so the more it looks like the standard login form, the better.
- There is space in the form for errors: the classic one is "Wrong email or password. Please try again." which intentionally doesn't tell them which of the 2 fields was wrong. It's a bit annoying as a user, but it prevents information from leaking to potential hackers.
- Another error to handle here is when someone tries too many passwords quickly. It could be a hacker or a very frustrated user. In this case, the right message is something like "Too many attempts, please contact support@yourdomain" — which both stops them from trying again, and shows you're happy to help them via email.
- As usual, the button is disabled until the form fields are filled in correctly.
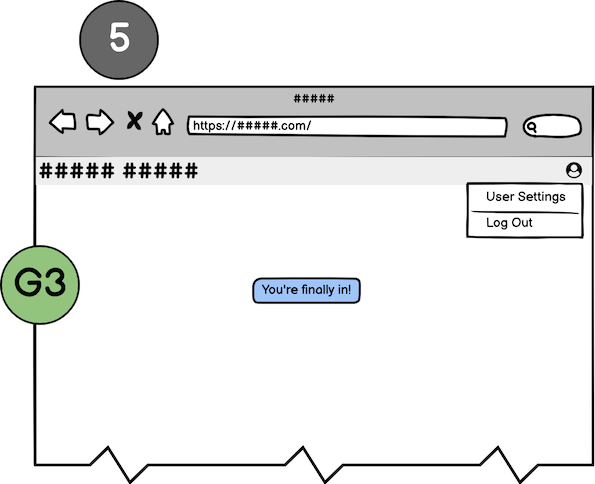
Once they login correctly, you can finally create their user account in your database, and let them in!
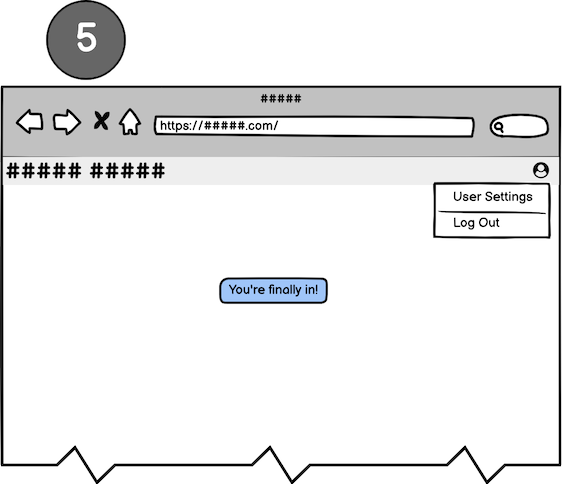
Phew! It took a while, but we’re here. We know that the user can receive our emails, and can login successfully. Time to party!
Obviously, you need to make sure you give users a way to update their email, password, or close their account (we do that in a User Settings dialog), or Log Out. The standard right now is to put those functions inside a little menu in the top right, triggered by clicking on your avatar.
Another aside: Helping people with multiple accounts
Here’s a special case you might not think about: you have a user who’s already logged in with one account, but creates another account — say, one is for work, the other is for personal use.
If they click on the email link to verify, and when they get there you notice they’re already logged in, you need to show something like this:
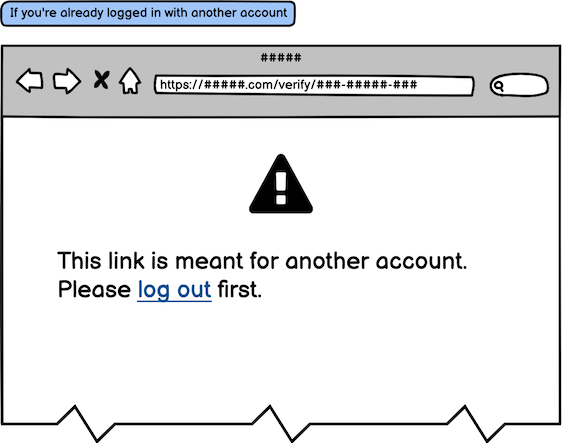
I know, SO MANY CASES TO THINK ABOUT!!!! Argh!!!! 😊
Alright, let's look at the other flow.
The shortcut: Google Authentication
Using Google authentication makes the process much much simpler, both for you and for the user.
Why? Because Google already verified their email address when they first signed up with Google! You don't need to do that, we can just rely on Google doing it for you.
Look at how easy the flow becomes. On the landing page, the user clicks on "sign-up quickly with Google authentication" and is taken to the standard Google OAuth screen:
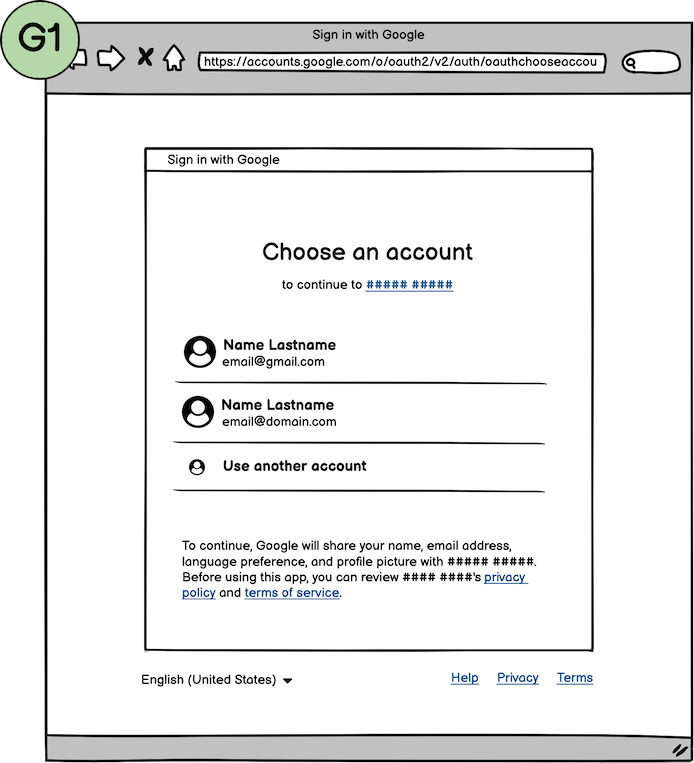
Note: this is a Google screen, you don't have to code it! 😊
With one click they can choose their account, and Google will send your web app their full name and email address... just like that!
Notice how Google's screen also links to your Privacy Policy and Terms of Service. This is very handy, but since we're fanatical about privacy, we don't think that's enough of a notification, so we add this step at this point:

This helps us really make sure the user has read and agreed to our terms — or at least they said they did by clicking on the required checkbox.
It only takes 2 clicks, and the new user is in!
So smooth... OAuth is a bit of a pain to code, but when it works, it's such a smooth experience for users.
We only offer Google authentication because many of our customers use it. Talk to your customers to see which one they want. We're also adding Single-Sign-On SAML authentication to Balsamiq Cloud, because some of our enterprise customers are asking for it. It's a pretty smooth process as well!
That's it. I hope this overview of the sign-up flow of Balsamiq Cloud was useful to you.
 By Peldi Guilizzoni
Got questions or feedback? Email peldi@balsamiq.com.


